jeudi 12 décembre 2013

Holiday Giveaway over at Wearing History!

Interested in historical costume sewing and/or 1930s and 1940s vintage styles? Lauren at Wearing History is hosting a giveaway right now and until Wednesday, Dec 18th!

She offers 3 prizes to whoever enters the give away, to choose from the two latest patterns (the 1940s Dahlia blouse and the 1930s Day or Evening bias blouse and skirt pattern) or from any of her other patterns you'd like! Clothing, hats, lingerie...so much to choose from!

If you want to enter the give away...this way please!

mercredi 4 décembre 2013

My participation for FESA 2013 : finished at last !

Well, this one took a long time coming. I first thought that 2 months would be more than enough to finish one garment, but life got in the way and I’ve been a bit under the weather emotionally, which deprived me of my sewing mojo.
But it’s all over and better now, and now my FESA participation is finished !
Sorry for this yellowish light, I don't understand what happened (and yet I did try to correct it in GIMP...my photo editing skills have to be improved. Duh.)

Here are the facts :

Pattern : Wearing History Home Front Overalls.

Fabric : linen and viscose blend, plus some white cotton for the facings and wrong side of straps.

Notions : thread (+ red cotton thread for my bound buttonholes), buttons, snap, fusible interfacing, bias tape.

Any difficulties ? Well…this is the second pattern from Wearing History that I’m making and I really think that, next time I order from them, I’ll take the smaller size pack. I actually made quite a few modifications to make the whole damn thing fit me. In the end, it does, but I had to make two muslins to attain a result that is still not perfect. But let’s not put all the « blame » (the notion of « blame » here is relative : Wearing History patterns are on the whole very well made, it’s just not so easy when you fall between two sizes!) on the pattern, shall we ? I think that, along with my perfectible sewing skills, the fabric also played its part in making this garment a challenge. It’s actually very shifty and the weave is rather loose, and I’m actually not sure, in spite of my efforts, that I cut all the pattern pieces on grain. And on top of it, that shit really frays like hell. Next time I’ll think twice before buying cheap fabric.
This pattern was also my first time using bias strip as a facing, which I’m not exactly fond of. Maybe it works on other types of garments, but as far as I’m concerned, a facing or even a lining might have worked better here.

Make again ? As this garment was quite long for me to make (partly because I had to alter the pattern, and partly because I’ve been tired and depressed while sewing it), I don’t think I’ll sew it again very soon…but my love for 40s overalls is intact, and I think there might be another pair of these in the future. In a beautiful wool (tweed, perhaps ?), or at least in a fabric with more body, like a twill or a gabardine.


Wear again ?Although I think this garment looks like it's been made by a 3-year-old, and although I technically consider, on second thought, as a 3rd (but wearable!!) muslin... Yes ! I will wear it again! But I think I'll wait till it gets warmer as the weather is starting to be chilly where I live.

lundi 7 octobre 2013

Fall Essentials Sewalong 2013 : a muslin

Sorry for the phone pic in my small wavy mirror...but I couldn't just go and take a picture in front of the mirror of my buildings hall wearing an unfinished garment, amirite?

First thoughts :

  • The pattern is said to run small at the hips, but apparently it should be fine for me ;
  • As with my 2 versions of the Smooth Sailing pants, I'll have to make a flat seat adjustment and remove some length from the front crotch seam;
  • I'm a bit astonished to see that the legs are just the right length (in fact, they might even be a bit short if I want to wear it with the hems rolled up), considering I had to remove something like almost 4 inches (about 10 cm) from both my Smooth Sailing pants to make them the length I wanted;
  • I'm not sure about the waist : is it OK, or should I make it a bit smaller (FYI : it's slightly too big in the 2 aforementioned pants)? Hard to decide, as everything here is held with safety pins!
  • The front bodice should be OK, however the back bodice looked a bit too small, but maybe just because of a bad placement of the shoulder straps;
  • I was a little bit perplexed by the waistband : it's too small for me, even though I'm a 28.5-29 across the waist and it's supposed to be 30 inches long, and it's smaller than the waistlines of the pants and bodice. What the f...udge is going on there? Maybe I'll just cut it very long and shorten it to suit my needs.
That's all for now, see ya!

lundi 23 septembre 2013

Fall Essentials Sewalong 2013 : My Palette

Well, it's actually not a palette as I don't think I'll be able to sew more than one garment. Therefore, only one color and one fabric.
I'll make my overalls in a fabric I already have in my stash : 

Linen/viscose blend from Toto, bought with no particular project in mind...Had actually already bought something very similar for a Ceylon, and as I was afraid I wouldn't have enough, I bought 2 more metres, only to find it wasn't exactly the same color as what I'd bought first. Never mind, I know how to use it now! 
Added to this : 


  • Anchor buttons left from  my B5895,
  • white thread (from stash)
  • And some bias trim (not pictured here.)
Started tracing my pattern yesterday evening - stay tuned if you want to know what's going on!

vendredi 20 septembre 2013

Follow me on FlickR!

Having decided to take part in the Fall Essentials Sewalong, I had to create a FlickR account in order to share with the other participants...after a few klutzy attempts (didn't get why on earth I had to use Yahoo to connect to FlickR...), my account is finally created! You can now follow me by clicking on the little button in the sidebar!

vendredi 13 septembre 2013

Taking part in my first Sewalong!

I often see people planning sewalongs all over the web...However, much as I would be interested to join in, there's always a hindrance. Either I don't have the pattern this particular sewalong is about, or I feel I don't have the skills, or the schedule seems to set a crazy pace I feel unable to follow.
But...this morning, as I was browsing my blog list, I fell on Sarah's latest post, announcing the Fall Essentials Sewalong...and it so happened that, for once, the schedule was right for me...and the (very un-restrictive) different categories of garments you could make for the sewalong did allow me to make something! So here i come!

I'm currently finishing another shirt for my boyfriend...but if I'm lucky, I should be done by September22nd, the day the sewalong starts!
And here's what I'm going to sew : 


While some of you may question the "essentiality" of overalls (and yet, in my opinion, they totally belong in the "Fashionable Foundations for Frosty Weather" category!), let me explain why this fits the bill for me :

  • they are perfect for a look that's vintage, yet casual, and doesn't make me feel as if I were wearing a costume (i mean, as opposed to a dress+heels+big hair+make up...I love vintage style but I'm not really the high-maintenance kind of girl!) ; 
  • they offer more coverage than pants, which is a bonus now that the weather is getting colder ;
  • they could go with lots of tops and shoes ;
  • and I happen to already have everything (fabric, thread, buttons, interfacing...) in my stash to make them almost straight away!

Want to be part of the sewalong? It's happening over at Rhinestones and Telephones!

lundi 9 septembre 2013

Butterick B5895, or the Stashbusting Failure

Hi everybody, I'm back from holidays!


Given that rather long post I did recently (yeah, I know, more than a month ago is not recent, but it's only two posts before last if you count this one!) about my expanding fabric stash, you might've thought I would have a reasonable holiday and sew from the aforementioned stash.
But I'm not reasonable, so that's not what I did.
I recently acquired B5895 - one of Butterick's patterns developped by Gertie - and I had some fabric which I thought would be great to make the blouse from this pattern set. But - even though I love sewing them - blouses are not the most needed item in my wardrobe, so I made the pants instead.


Sorry for this "mirror and phone" pic...I didn't have the occasion to go outside and take a picture of them in decent conditions. At least the mirror in my building hall is bigger than the one in my apartment and allows for better pictures!

Want some technical details? There you go!

Fabric : navy poly/cotton sateen with a bit of stretch
Notions : zipper, piping, button, bias trim
Any difficulties ? I've been fiddling a bit to get the fit right, but it's normal when you're making pants and not especially used to it, don't you think? I actually made a muslin in size 12 which was...sort of fine at the front, albeit a bit tight across the thighs...but sadly impossible to close from behind. I was therefore diagnosed with big quadricepses and a full bum. Relying on the pants fitting cheat sheet (thank you Coletterie!), I modified my pattern to make more room for my thighs and buttocks. Muslin#2 allowed me to let in my quadricepses and buttocks…and was even a little roomy! So in comes Muslin#2.5, which was basically Muslin #2 with less fabric at the crotch on the front, and the back re-made to be a little bit tighter. Muslin#2.5 turned up to be still a little tight across the thighs, but perfect at the back, so, as I was making the final garment in a slightly stretchy fabric, I decided to leave it at that. The final version is very comfy and a wee bit roomy (after all, the pattern says the jeans are supposed to be “semi-fitted”, doesn’t it?), but maybe that’s because of pressing the fabric during the process? I hope it will tighten a bit when I wash it, otherwise I won’t be able to wear these pants if I lose weight!
Apart from that, all my seams have pretty finishes (topstitching at the crotch, flat felled seams on the inside legs, turned under and stitched on the outside legs, and bias bound on the zipper… I’m getting better!), I made my very first (well, second, really, and the first, done on a fabric scrap, unfortunately looked much better than the second…) bound buttonhole (thanks to Julia Bobbin for her tutorial!). I also had to redraft the waistband (hadn’t considered that making adjustments at the back would lead to changing it, so it’s finally made with two pieces instead of one…) and used scraps of linen as a sew-in interfacing as I thought my fusible interfacing was too stiff. 

4 details on the same pic, how good is that!?Piping, bias bound zipper, handpicked zipper and (urgh) bound buttonhole...Sorry for the flash, the light is crappy in my bedroom and these dark fabrics are hard to photograph!

...and here's my button! Cute, eh?

Wear again ? Although they’re not really office friendly, these little pants are really great for week end and holidays and will surely see a good deal of wear in the future!
Make again ? Actually, I think I will! I’m sure this pants would look great in a corduroy for example, and slightly longer (ankle-length or mid-calf, something like that for instance!). And that would be both winter- and office-appropriate!

mardi 16 juillet 2013

First UFO : finished at last!

Hi folks!
Remember the Lonsdale dress I mentioned in this post? Well, it's over now!


As I said last year, I first thought, as I'd read before that Sewaholic caters for pear-shaped ladies, that i'd need an FBA, not thinking of myself as pear shaped. However it turned out that what I needed was more room at the waist. I therefore proceeded to add whatever was needed, made 2 bodice muslins that didn't fit...and then, before I knew it, my holidays were over, and the time to wear breezy summer dresses was gone. So I stuffed my muslins away and worked on some Fall sewing.
But...I didn't want to call it a day! So, a bit more than two weeks ago, I took the most recent of my 2 muslins and tried it on again. As it was still too tight at the waist, and I didn't want to bother altering my traced pattern one more time, I decided to re-trace the whole bodice entirely, grading up from a size 6 at the bust, to a size 8 at the waist and hips. And, lo and behold, the fit of my 3rd muslin was much better!
Once that matter was settled, putting the whole dress together was a really quick and pleasant job. The only other alteration I made was to move the loops to the side a little bit, so the straps didn't cover my back tat.

At first I wanted to finish all the seams in the skirt with bias strip, but I finally just finished the center back seam and the zipper this way, using a cute anchor print bias trim. The other seams are just turned under and stitched, which is probably going to be my new favorite seam finish for light fabrics. I also handpicked the zipper and I have to say I really love that way of attaching zippers! I'm still a bit awkward with my machine when it comes to attaching zippers (remember this epic invisible zipper fail on my Lily dress?) and this technique allows me to get as close as I can to an invisible zipper (even if it's not an invisible zipper per say).
Here, you can see the anchor print bias trim and the lace-trimmed hem. Sorry about the flash, but if I hadn't used it you couldn't have seen the lace!

I also wanted to finish the hem with lace, which is probably not the best idea I ever had. It just took AGES. And although it doesn't show unless you have your nose sticked to it, it looks like weird scalloped stitches  on the right side of the dress (er...let's just say it's an intentional design effect, shall we?). Lesson learned, and note to myself : If you're not patient enough to make it fancy, then keep it simple. And if you want to do this kind of finish, underline, so it doesn't show on the outside.

And now, a few technical details : 

Fabric : 100% navy polkadot cotton lawn
Notions : zipper, bias trim, lace trim
Any difficulties ? None whatsoever, although I tried to make things complicated when I should have kept them simple (lace-trimmed hem vs simple hem).
Wear again ? Sure, as often as possible! This is a great dress for week-ends, easy to dress up or down.
Make again ? Not sure yet ...but I might, considering how quick it is to make!I just have to find the right fabric!

Other outfit details : 
Hair flowers from Claire's (big white rose) and Paradirama (orange orchid)
Belt and handbag from H&M's
Bluebird sandals from Miss L Fire.
Chiffon scarf (on handbag) from Rockahula Isla Retro Delights
Vogue sunglasses from my local optician, a few years ago.

vendredi 12 juillet 2013

Fabric splurge : C'est grave, docteur?

Sorry for this title, but I couldn't find how to translate this typically French expression and chose to just leave it this way.

Thanks to some new IRL sewing acquaintances I met through Thread and Needles, I have started rummaging in the bins in my local Toto fabric store (sorry, I'm not giving you the link for their website because it does'nt seem to work, but for those who don't live in France, Toto is a place where you can find fabrics by weight, and when you're lucky it's really, really cheap. They also specialize in wax and African fabrics), and ever since I started, it seems I am doomed. Doomed to never leave this place, whenever I come in, without buying something.

Here's what I scored recently :

Anchor print cotton : this cost me 0.70€ and I think I just have enough for a top. And if I use Colette's Sorbetto pattern, it will be an almost free top - 0.70€ for a garment, who can beat that?


Hokusai Wave cotton in pink : although this 100% cotton fabric has a weird, somewhat paper-y hand, I fell in love with the print the minute I saw it! I hope it is going to be softer once I wash it, though. To keep it in a sort of Japanese/nautical theme, I'll probably make a Sencha blouse with it. All I have left to find is mother-of-pearl buttons to go with it!


Surfboard cotton : I got 3m of this one in 140cm width! This should be more than enought to make the shirt from B 5895. (Now looking for a fabric to make the pants!)


Lobster cotton : I first saw this fabric in the hands of an old lady, in the "fabrics by weight" section. Of course, I had to have it! I think the tie top from Wearing History's Sunkissed Sweetheart beach separates would really look fun in this print. And maybe I'd have enough to make the matching shorts...we'll see!


Grey/blue linen/viscose blend : I've been looking for AGES for the right chambray/lightweight denim to turn into a Ceylon. I love that pattern, I've had it for over a year and have not made it yet for lack of THE perfect fabric to give it that casual, everyday-wearable (oops...have I just made up a new word?) look...but now I found this fabric, I have no excuse left not to make it!I might also make the back yoke in a contrasting fabric. Plaid, checks, bandana print fabric...something with a western feel to it. What would you think?


Finally, this was not from a splurge but a birthday gift from my sister : a generous yardage of beautiful raspberry pink silk from Lyon, the French city of Silk. I think I will have more than enough of it to make another Sencha top, probably with some beading around the neckline (possibly something inspired by the gown Fleur is wearing in this post...but I have yet to learn how to make it!) 


Well, I think my sewing plan for this summer is going to be heavy!I'll have to get organized, but I don't know what to start with!

jeudi 4 juillet 2013

Smooth sailing pants : how to turn the side zipper into a side button closure

Better late than never...Sorry for not posting at all in June but my work schedule was very, very tight and it was therefore harder to find time for blogging! Anyway, here you go! Watch out, this is a photo-heavy post!

I’ve already made a wintery, dark green wool version of the Smooth Sailing pants. I had hardly finished it when I started thinking, why not make one summer version? Or 2, or 3…? And then, why not using buttons instead of a zipper closure? Thing is, I didn’t know how to do that…however, after a bit of asking around and drafting, I figured out how to do it, and I can now propose you a little tutorial about how to convert a side zipper into a side button closure.
My method might not be very academic, but I can still share it with you, for what it’s worth. Hope you enjoy it!

How to convert a side zipper into a side button closure?

To begin with, we are going to draft a little pattern piece to make the button placket. Here are the measurements you will need to draw it:
  • Length (I chose the same length as the zipper advised in the pattern, i.e. 12cm/ 6in) – be careful to include your seam allowance in the length )
  • Width : you will have to take into account the diameter of your buttons, plus the space you want on each side of the buttons, plus the seam allowance. My pattern piece is thus 6cm wide at its widest point.
  • Button diameter (here, 2cm).

Here is my pattern. My buttons were 2cm wide and I decided to leave 1 cm on each side, plus one more cm (1/2 in) as a seam allowance. There are 2 cm between the top button and the upper edge of the pattern, seam allowance included, and 1.5 cm between each button. More space is left – about 3 cm – between the bottom button and the lower edge of the pattern. All in all, I used 5 buttons, including the one at the waistband.

You will cut 4 of these pattern pieces (following the grainline of the fabric), 2 of which being reinforced with fusible interfacing.


Then, take 2 of each pattern pieces - one of them interfaced, but not the other, and sew them, right sides together, following the curved line.

Grade your seam allowances, notch when needed, and then turn them to the right side.

Then proceed to put your pants together. Follow the pattern instructions until you have to insert the zipper.

Take your button placket pieces. The piece on which you will sew the buttons is going to be attached to the left back part of the pants, the other to the left front.
Pin one of your button plackets to the left front part of pants, right sides together, as shown below.


Stitch, then flip it to the wrong side of your pants.

Press, then trim the seam allowance that will end up facing the wrong side of the fabric...

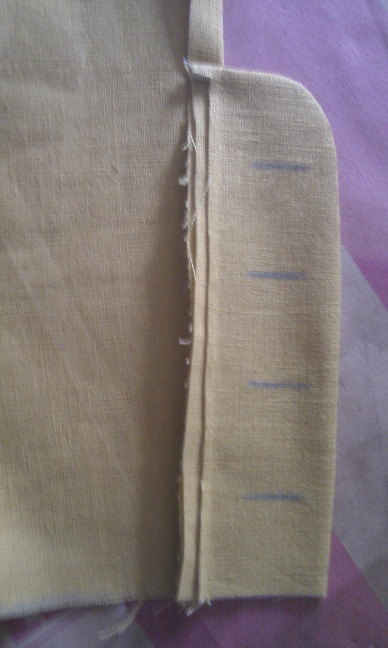
Flip to the wrong side once more...


Topstitch...


Here’s how it’s going to look like, once the buttonholes are made :

(Yes, I know, I handworked my buttonholes somewhat hastily and it shows...)
Now, take the back left part of your pants and attach the piece on which the buttons will be sewn. Pin it right sides together and stitch. Then, as you did previously, fold your seam allowance to the wrong side of your fabric and topstitch in place.

Here’s how it looks, once the buttons are sewn in place :


You can now proceed with your sewing, following pattern instructions, until you get to the waistband part.

As one of the sides of your button placket sticks out (the one which is going to carry the buttons), you will have to cut the waistband longer so you encase it within your waistband. As for me, I cut a 32 in. length for the waistband, but if you are not sure, the better is to make it longer than needed and then cut the excess. Interface your waistband as instructed on the pattern and carefully mark some folds, this will help you sew it in place afterwards :
You will first fold your waistband in the middle, lengthwise, and press. Then, you will fold the raw edges of your waistband, first at each end - fold about 1 cm towards the wrong side of your waistband and press. Do the same with the lowest part of the waistband, which will be attached to your pants. Then stitch your waistband as instructed on the pattern. Remember to tuck the raw edges inside at each end of your waistband and stitch it shut. You can topstitch your waistband if you like. I chose not to make the belt loops, so that the side button closure could be the main center of interest.

(Sorry, I stupidly forgot to take pictures to illustrate that part.)

Your pants will now be close to finished! All you’ve got left to do is make your buttonholes (4 on the placket + 1 on the waistband), either by machine or by hand, and then sew your buttons in place.
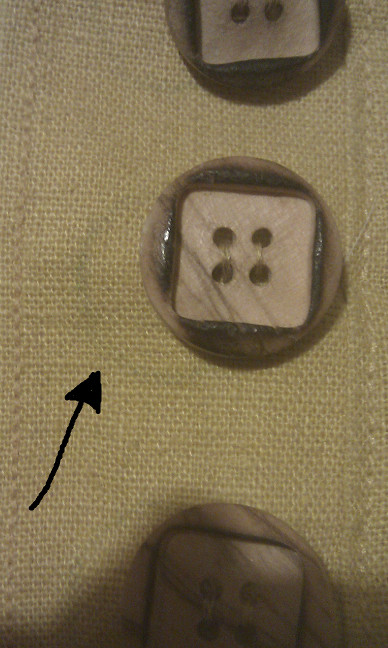
Watch out where you sew your buttons : when I made a muslin of my side-buttoned pants, I had overlapped the two parts of my button placket (buttonholes over buttons) and made marks with chalk inside the buttonholes to mark the spot for the buttons. Which I sewed, then, right on the middle of the lines I had drawn, only to find out later that the buttonholes were actually pulling on the buttons and that the 2 parts of my button placket did not overlap anymore - there was a gap of about 5mm where everything should have overlapped smoothly.
To avoid this, when I sewed the final garment, I did not sew my buttons right in the middle of the chalk lines - I slightly pushed them to the right. The picture below shows that the buttons are not quite sewn on the spot originally made for them (the little arrow is pointing that mark, which you can barely see).

As a result, the 2 parts of my button placket overlap just as they should and there is no gap (see below!).

When you’ve reached this point, all you’ve got left to do is...well, hem your pants (with or without cuffs), wear them and be happy!      


Side note : I really can't understand why, but my cat keeps chewing at the buttons of these pants and trying to bite them off whenever I'm not looking. I swear, even when I'm just sitting on the couch, she's trying to eat those damn buttons - and she even succeeded in splitting one of them in 2. B****.

vendredi 31 mai 2013

Smooth Sailing : Take 2

Dressing for work can be a bit tricky for me. How could I find a style that's not too dressy (I work in a non profit organization and the dress code, if any, is very relaxed), still vintage but not too flashy either? Well, vintage casual seems to be the key!
And, speaking of vintage casual, Wearing History's Smooth Sailing pants totally fit the bill, which is why I've made a second pair!
Having made a muslin for the previous version (dark green wool ones), I did no fitting changes at all, but...I made one little change all the same : I replaced the side zipper with buttons. Paired with my fabric - a beautiful yellow linen - I think they add a touch of fun and give the pants a nice summery look!

Here's a picture, hastily snapped by my boyfriend as I had just finished it! Not the best pic ever, but  at least it shows that the pants fit, and you can see the button closure! 


On top of that, for - I think - the first time in my life, I've been wondering, before making these pants : what am I going to wear with them? As a result, I can wear these pants with something like 4 different pairs of shoes and 4 tops...Another great piece of "cake" added to my closet, then!
For those that are interested, I even made a tutorial on how to replace the side zipper with buttons, which I'll be posting shortly!

mardi 30 avril 2013

The "Psychobilly Freakout" shirt

After an uneventful - sewing-wise, that is - month of March, I'm back to show what I've made last - another shirt for my boyfriend, from what is now becoming a tried and true pattern - Kwik Sew 3484.
This one is actually much simpler than the first - which you can see here - but there's actually a reason for it : it was actually simply supposed to be a background for a patch! Consequentially, the fabric and the thread I used for the buttonholes (handworked...again!) were actually chosen to match the colors of the patch!
Here's the shirt itself...


And here's the justification for the title of this post!
The fabric is a poly/cotton blend in a dark/greyish blue, the buttons are grey metal and the buttonholes are made with red thread. I initially intended to topstitch with the same thread I used to make the buttonholes, but my machine would have none of it. On top of it, at first I thought topstitching was just a long, straight machine stitch done with a thicker thread and a specific needle...so I went to my sewing machine and sewing supplies dealer and asked for such a needle, to which he answered there were no such needles (although I do remember reading about it...) and that topstitching was actually a specific stitch! You can imagine I felt pretty dumb.

But that's how you learn I guess...I finally found out the setting on my machine and will be able to topstitch the hell out of my next project. Stay tuned for that :)

And now I'm going to leave you with some music. Hope you enjoy it!


mercredi 27 mars 2013

Happy birthday, blog!

Hello everybody!

Just dropping by to wish my blog a happy first birthday!
All I can say is, I'm far from being as regular as most of the other bloggers that I follow, and I may not deal with as many intersting topics...but I'm still here and I'll try to keep it going and make it better!

Have a nice day y'all!

mercredi 20 février 2013

Yours Truly 1 - Pants 0

...Well, of course, this doesn't mean that the pants, and, most of all, the pattern I used to make them, are rubbish. Definitely not. Quite the contrary. Au contraire.
I only mean this : I DID IT!!!!!!!!!!!!!!!!!!!!
My first pair of pants!

Here's the proof :

Crappy photo, blurry, my arms look like an old man's, there's all our mess in the background, and what kind of a face am I pulling??? But I thought, better a bad picture than no picture at all, and it's my only picture of these pants for the moment. I will update as soon as I manage to take a better one, I promise.


And here are the details :

Pattern : Pants from Wearing History Smooth Sailing 1930s Sport Togs - size pack B

Fabric : dark green 100% wool gabardine.

Notions : thread, 7 inch zipper, one button.

Any difficulties? No construction difficulties whatsoever, but of course I had to fiddle a bit to get the fit right, and for this I say a huge thank you to Lauren, the boss at Wearing History Patterns. My fabric was also a bit hard to press, but I used Tasha's recipe and it made the whole pressing business much easier. Also, I couldn't figure out how to insert the waisband in my 2 muslins - the waistband seemed shorter than my waist meaurement - but that was because I was doing it all wrong (RTFM!!!). I chose to cut the waistband one size bigger for my final version (32 in., a little bit big when you know my actual waist measurement is 28.5 in.)...as I was tired, I put the interfacing on the wrong side of the fabric (or should I say, on the right side, when it was actually supposed to be on the wrong side), sewed the underlap somewhat upside down...but after some cursing and wild seam ripper action, I finally got there, and I'm quite happy I did! My waistband is actually a bit too large and saggy, but oh well...live and learn! 

Wear again? I've already worn these pants 3 days in a row, and I will wear them again for sure. I was in need for some cake in my wardrobe, and this is just what they are : vintage-looking, office-friendly, comfy, easy to dress up or down...they tick every box!
Now I just have to find the best and cheapest way to care for it. Although there is enough room in these pants for me to breathe comfortably, and although I think it would still be OK even if they shrank a little bit, they shouldn't shrink too much either...I still want to be able to wear them!So I'm afraid I'll have to take a trip to the dry cleaners everytime I want to wash them. Well...I'll try not to put too much dirt on them!

Make again? Actually, I'm quite eager to be in March, which is when my fabric store is re-stocked with linen. I'd love to make a few more of these pants, probably in mustard yellow, peacock blue and terracotta orange/red.


lundi 14 janvier 2013

1st 2013 finished project - The Caribbean Seas Violet

Watch out : this post is going to contain some rather heavy self-congratulations.
Here it is, then, my first make for 2013! Just finished on January 2nd!


(apologies for this picture - on top of me being a bad photographer, the light in my appartment is terrible and the fabric doesn't come out as pretty as it really is. It actually looks more like what you can see on this pic.)
 Now, why a "Caribbean Seas Violet", do you ask? Well first because my fabric is Madras cotton, hence the "Caribbean"...and if you want the explanation for "Seas", why don't you look at the buttons?
Fishes!!!

Without further ado, here are the details of this project :

Pattern : Colette Patterns Violet.
Fabric :100% Madras cotton, from my local fabric store.

Notions : tropical fish-shaped buttons and piping.

Any difficulties ? The Violet pattern is actually marked for beginners, and if you follow the directions, it is indeed very easy and quick to make. However this project did not go without a few challenges : some that I set for myself - a fabric with a directionnal weave,  piping (which I'd never used before), and a little addition to the pattern in the form of cuffed sleeves - and one that was unexpected - having to do a SBA. I also decided to cut the back yoke on the bias and make handworked buttonholes. Furthermore, I tried to pay more attention to the finishings : although the main seams are simply finished with a zigzag stitch, my facing is bias-bound!
I did not rush myself through this project - although I think it all came together pretty quickly - and I'm really glad I did not, because for the first time I can look at something I've made and be really proud of myself. No clumsy seam finishing, perfectly inserted sleeves (if I do say so myself...), correct hems...Yes. I'm happy about it.

Here's a cuffed sleeve. I drafted the cuff pattern myself and I'm pretty happy of how the cuff matches the fabric below it!

And here's my bias-cut back yoke.
Wear again ? Certainly...once the appropriate weather for light blouses is back! I wore it once already, but because of the cold it remained hidden under my sweater. Duh.

Make again ? I can't say it yet...I still consider myself a beginner seamstress, and as such I'm most attracted to making new things, vs taking back an "old" pattern and making another version of a garment I already own. But this blouse was definitely fun and easy to make, and on top of it it made me more confident about some things - inserting sleeves for instance - and it enabled me to try new skills. So I'd say yes, I'll probably make another violet, even if it's not in a near future.
Oh, and if I make it again, maybe I'll try to make the collar slightly more narrow.

And you, what was your first 2013 sewing project?

mardi 8 janvier 2013

Happy New Year!

Well, that's not very original, but why not start 2013 by wishing anybody who'd stumble upon this humble blog a year 2013 as happy as possible?
I know it is also usual on sewing blogs to go back over the sewing projects of the year gone by...I had started doing this when I celebrated my 1st "sewversary" and will continue shortly.
As for goals to reach on this new year...I won't be giving myself too many goals to get to. Become more organized at work and at home would be a good thing to start with. And then...wait and see.

And I say it again, Happy New Year everybody!